Quantcast
Channel: The Vintique Object
Viewing all 102 articles
Browse latest View live

A few recent projects for Walrus

$
0
0


Well, our little shop is doing pretty well! So well, in fact, that we are scrambling to keep up with inventory. It's not an easy to thing to  "man" a shop AND produce the inventory. Especially when you've still got your kids at home full time -- minus a few hours of preschool each week.  But somehow Wendy and I are making it happen.


 Anyway, I thought I'd share a few recent projects, like this industrial side table.  I found the card file at a salvage shop and was about to order hairpin legs for it to make it into a table when a friend of mine called and said she had some stuff to give us.  (Thanks, Monika!!) One of those things was a falling apart vintage side table with hairpin legs.  How's that for fortuitous?  The legs easily came off the old piece and Wendy cut the a new base out of plywood so I had something to attach both the card file and legs to.  This one sold quickly.  Industrial is still hot.


We're also doing a lot of custom work.  We recently got two of these broken antique chairs (both broken in the exact same place from years of right-handed folks pulling them out from a table.  The wood was literally split and pieces were missing.  They'd been tacked back together with nails, but eventually that didn't hold it together either.  Because the client asked us to paint them to match a set of her existing black chairs, I was able to screw the wood together using a counter-sink drill bit and then fill with wood filler.

Nothing a little paint can't cover.


The two chairs we were asked to match were painted with in glossy black, and I have to say that I am surprised by how this glossy paint looks on an old marred antique chair.  I love it.  If you look closely at the painted chair, you can barely see the fix.   A guest would never know it was repaired.

I'm normally against painting antiques, but when a piece is that broken, it's a good way to salvage a quality, real wood piece of furniture. Because otherwise it sits dusty and unused in the basement for 10 years -- like these did. :)

You wouldn't believe the support we're getting from our community.  Folks love that we repurpose and upcycle, so when they have furniture to get rid of, they often give it to us.  Complete strangers!


Take this solid wood two-drawer chest, for example.  A customer dropped by to browse and when he saw the kind of work we do, he showed up a few minutes later with a carload of furniture which he gave to us for free.  It included this office-y looking piece. 

 I transformed it into this with the help from my Cutting Edge inlay stencil:
I hadn't purchased the new pulls (vintage-y looking clear glass numbers) when I took this photo, but you get the picture.


I'm feeling particularly proud of this piece because it was pretty painstaking and I worked on it late nights to get it ready for Walrus before we headed out-of-town for a few days. 

Which is where we still are as I write this post.  With the stomach bug. :(

I'll try to be back soon with the next installment of my five favorite series.  I hope you'll understand if it's not until next week, though.


Ashley Putnam Does it Again!

$
0
0


I first wrote about my love for graphic designer (she should be an interior designer) Ashley Putnam's work here and here.   Now she's gone and knocked my socks off again with this farmhouse family get-away in Round Rock, Texas.

What a change in style (in some ways) from her previous two houses.  This one feels a bit more rustic and neutral compared to her previous abodes, but the eclectic nature of her decorating still manages to look cohesive and so well done.  I could move straight in and wouldn't change a thing!

To see other photos of this house featured HeyBillie.com, click here.

Our first magazine feature!

$
0
0


Wendy and I are thrilled to have our shop included  in 7X7 San Francisco's April Home and Design issue. 


They ran a story about Temescal Alley.  How fun to be one of the shops included!

See the photo of the yellow door?  That's us!


Here's write-up about Walrus.

We're gearing up for an extra number of folks coming across the bridge from San Francisco to visit the alley this weekend.

Big smiles here! 

Making a Standard Fridge Counter-Depth

$
0
0


Hello All,

Just a quick post about an ingenious idea I saw on the latest issue of House and Home TV.  (There are no photos out yet, save this one.)  Love this redone kitchen by Mandy Milks, the Art Director at House and Home.   Not only is it attractive, but it employs some great tricks. 

One of my pet peeves in my kitchen is how the fridge sticks out so much further than the counter.   (Which I'll just have to live with since we're in a rental.)  In the above photo you can how Mandy's fridge sits flush with the counter top and appears to be built-in.  Mandy got the standard 24 inch depth counters, but pushed them forward and used a 30 inch counter top.  Picture a gap between the cabinet and the wall.  This gave her more working space in her small kitchen, let her put in a pop-up vent behind the cooktop, and allowed her to use open shelves without too much overhang.

While I have no idea whether her fridge is counter depth (23 to 27 inches) or standard depth (30 to 34 inches), pushing the cabinets forward is a great way to have your standard depth fridge sit flush with the counter top -- and give it that built-in look. 

To see the episode, click on the photo. 

Top Five Favorite Bathrooms

$
0
0
It's been nearly a month since my last post. Guess I needed a bit of a break! :)

I'm back today with my top five favorite bathrooms, a continuation of my Five Favorites Series.


I tell you, I do love a nautical design, and this one feels both clean, cottage-y, and just a bit fancy at the same time with the gorgeous brass plumbing.  Love the black bottomed wall mounted sinks.  Add the subtle stripes on the wall, the floor to ceiling window, the dark floor, and the lockers, and this design is a pure winner in my book.  The only thing I'd change are the light fixtures.  I think they compete with the  fabulousness of the sinks.


I'm a big fan of green, so this one makes the cut for the awesome sink, the planked walls above the subway tile, the hex-tiled floors, and the old wooden stools.  The touch of orange in the towels is pretty great with the green too. 


That vanity rocks.  All there is too it.  Here we see white planked walls and hex-tile floors again.


I love Spanish Mediterranean, and this bathroom fit the bill for that style exactly.  The vanity is amazing, and who cannot love the window above it?


In that same vein, sometimes you want to see a bathroom that's a bit different, and I do love the Spanish Mediterranean beauty.  So earthy and natural. 
 
This one is by Mandy Milks, House and Home's art director.  I love everything she's done with her house.  Great mix of modern and vintage here.   


Compared to the post on living rooms, it was actually pretty hard to narrow down my top five favorites for the bathroom.  If you want to see the images from which I picked on my Pinterest Bathroom page, click here

**I also just added some new shelving to my bathroom. Will have to see if I can take pictures of that before another month passes.

Composing Photos: Styling so the Eye Travels Part II

$
0
0


It's been quite awhile since I posted anything on my Photographing Rooms series.  This photo is a good example of so much of what I've talked about.  It is styled to allow the eye to travel from top to bottom of the photo as well as from side to side.  Notice how your eye can travel from the light fixture at the top, to mirror and then zig-zagging from the toiletries on the shelf to the arrangement the sink to towel, and then to the basket on the floor.

The fact that the accessories are all black, white, and yellow helps that to happen.  It's also interesting how the white shower curtain on the left mirrors the black door on the right. 

A beautifully styled and photographed bathroom, I'd say.

Now onto another topic.  I used to copy all of my images from Pinterest thinking they'd be around forever and none of the pictures would "go missing" from my blog.  Bad idea.  I'm missing a huge number of images now, especially from my Photographing Rooms series.  What do I do about this?  How do I make sure my images never go missing?  Would love your advice. 


New Mexico Architecture

$
0
0
I recently returned from a trip to New Mexico and thought I'd share with you a few photos of glorious architecture (at least in my mind) from my home state, both houses found via Su Casa magazine.


This Albuquerque house was designed and built in 1937 by "the father of Santa Fe style", John Gaw Meem.   The New York architect came to New Mexico's arid climate in the 1920s to treat his tuberculosis and designed sleeping porches like this as part of the treatment.   Note the combination of rustic and formal elements that characterize this Territorial Revival style.  The vigas (beams) and corner kiva fireplace blend well with pedimented exterior windows and French doors.  You can read more about this meticulously restored house by clicking on either photo.


Also featured in Su Casa magazine is this contemporary adobe Santa Fe area house belonging to New Mexico builder Andrew Greer.  (I can't look at this room without thinking of Ina Garten's barn, by the way.)

According to the article, Mr. Greer "seems to have internalized the gestalt of New Mexico village architecture."  Having grown up there, I couldn't agree more.  If I were ever to build a house in New Mexico, Andrew Greer would be my guy!

Note those pedimented windows!
 Because on my list of dream home ideas is a very simple portal covering at least two sides of the house, like this.

I think my love for rustic and antique, white and simple mixed with formal must come from being raised a New Mexican.  Both of these houses feel like home.  

Five Favorite Kitchens

$
0
0


Here's a continuation of my five favorites series.  Today I'm focusing on the kitchen -- my favorite area of the house.


I pretty much adore this huge wooden island.  The white cabinets, the black soapstone sink and counters, the simple white cabinets with iron handles, the beams along the ceiling, the glorious bright light -- all are perfect together.  And the chalkboard on what I assume is a built-in fridge adds just the right touch of depth and fun.  Who wouldn't love to cook here?  Anyone have more information on this kitchen?


What really makes this kitchen shine is that it is so different.  The planking used to create the gable above the doorway is stunning.  And I love how the homeowner used a piece of stone set up on blocks to raise the long table to counter-height so that he can chop while his guests sit around the table.   Take a look also at the sink on the left.  The faucet is wall-mounted and the sink runs the entire length of the cabinet.

A cobbled-together feel is what makes the kitchen stand-out to me.  The sink cabinet was originally an antique shop counter.  Love that metal storage locker with the dishes too. 

I love this kitchen for it's contrasts.  Dark and light, white and wood, traditional and modern.  Such a beautiful mix, and done on a budget too.  Those are ikea cabinets, if I remember correctly.  Love the wall of hand-painted tiles and notes of blue throughout.


This kitchen was part of the Cottage Living idea house back in 2008? (The entire house was a knock-out.) Not only are the bones great (who cannot love the arched french doors!)  but this kitchen was the first time I had ever seen so many of today's popular design elements:  open shelves rather than uppers, chevron, Moorish tile, a different material used on the island top, baskets for texture...  I LOVE the green color of the lower cabinets.  And the pantry is pretty great too, although not sure I would pick that color.  Another great place to cook and hang-out.

[click photos for sources]

The Cobbled Together Kitchen, Part 1

$
0
0


We're back to my favorite decorating topic:  The Kitchen.

But let's back up a bit before we get to the topic at hand.   When I was in my mid-twenties, single, and wondering if I could ever afford to buy a house on my meager teacher's salary, I had this dream of purchasing a large metal building.  One like those used on farms for storage or to house businesses in an industrial park.  In my dream, I'd buy one and turn it into a house.

Something almost exactly like this, actually:


I even pictured the metal awnings over the doors and windows with red gooseneck porch lights on either side of each. 

Inside my metal house, I'd cobble together a kitchen from stainless steel restaurant supply kitchen parts.   Something like this:


Or this:


And this:

And this:


If industrial/restaurant kitchens can be made from these elements, then why not a household kitchen?

There are drawbacks, I'm sure.  Imagine trying to clean under all those tables on legs, for example.  Plus, storage space would be an issue.  And I have no idea how cost effective it would be, but it would surely be a savings over a custom fitted kitchen.   

Certainly, my idea to buy the metal building was a somewhat ridiculous notion in the savings category.  When I asked a builder friend at the time if turning a metal building into a house would be cost effective, he told me it would be cheaper to build a house stick and frame.   But it was fun to dream. :)

Coming soon will be part 2 of The Cobbled Together Kitchen.  If I were to assemble a kitchen from various free standing parts, I'd look at doing more than simple stainless steel.  (My metal house-with-stainless-steel-kitchen idea took place was in the early 2000s, when everything stainless steel/silver metal was hot!)  In part 2, I'll show you lots of lovely examples which using wooden and enameled elements. 

[click on photos for sources]


The Cobbled Together Kitchen, Part 2

$
0
0


Referring back to my 
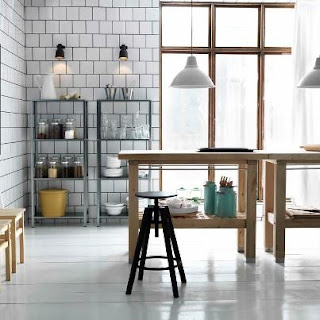
previous post in Part 1, I've been interested lately in how folks design kitchens using free standing pieces of furniture rather than custom-fitted cabinets.  I promised you I'd show a few kitchen that had been cobbled together using more than just stainless steel pieces from the restaurant supply store. 

Let's start with this favorite photo, which I have now posted at least three times on this blog:

Here, you can see the sink, which was built into an old counter from an antique shop.  The dishwasher has also been built into this unit.  The metal locker or cabinet used to store dishes is placed next to the free standing fridge.


 Here is another view of the same kitchen.  I like when you can see how the three main work horses of the kitchen -- the fridge, stove, and sink -- are all placed in a cobbled together kitchen.


 Here is differently styled photo of the same kitchen.  To see more pictures and read more about this kitchen, which Joni of Cote de Texas terms "unfitted" click here.


Quite a few unfitted kitchens use interesting cabinetry to house the sink.

This might be an odd way to wash your dishes, but I guess you'd have to think of the sink as long rather than wide. 

This kitchen was put into what was once a church in London. 

In this view, you can just see what looks like two side-by-side counter height fridges tucked under a metal work table.  


In this Parisian flat, a sink (far left) has been integrated into a huge cement table top.  Great for washing veggies before sitting down to leisurely chop them, but thankfully there is another near the stove for dish washing.  I wonder if there is also a counter-height fridge under the dishwashing sink.  Does anyone know if it is common to have smaller fridges in Europe?


In this kitchen, the sink has somehow been built-in to a bunch of metal rolling carts which are topped with some kind of sleek solid surface. 


Though it looks antique, it's hard to imagine how that work table could not have been fabricated specifically to house the sink with its special lip of wood to cover the sink bowl. Note the free standing cabinet to the right of the sink and the old work bench used as an island. 


One of my favorite items in a cobbled together kitchen the vintage enamel sink.

This one manages to sit high enough that a dishwasher can be placed partially under it.


I just love these beauties with their built-in drainboards.

Although the old-fashioned enamel sink is harder to see here, I think it's interesting to see how the homeowners cobbled this kitchen together.  I love the old stove with the yellow cart next to it.  Notice how the forks and knives reside in cups on top of the cart, probably for lack of overall drawer space.  There's a dedicated chopping block/island, plenty of open shelves for dishes, a pot rack for the pots, a dishwasher topped with butcher block next to the sink, and of course the fridge.  But where, I wonder, are the cans of tuna kept? :)

 A few other cobbled together kitchens to enjoy:

Though you can't see the stove in Ellen DeGeneres and Portia De Rossi's ranch kitchen , you can see the fridge behind the chalkboard. And to the left of that the sink.  Such amazing finds to create this kitchen, including the metal and wood counter/set of shelves for pantry items and dishes.


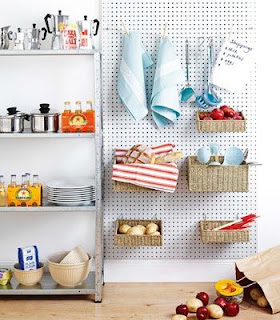
These open shelves hold an amazing amount of stuff.  I like how you can see real life kitchen things here, like a toaster, and the bottles of spices.  Clearly these people eat quite a few potatoes.  Or more likely the photo stylist liked the way they looked with all of the rustic wood.


I think one challenge of the free standing kitchen would be finding spots for all of things you would normally put in drawers.  Here, homeowner found a separate set of wooden drawers to fit under the counter.

Or better yet, you could magically happen upon an antique drawer unit.  Simply lay a row of bricks under it to bring it to counter height.


We can't see the fridge or stove, but there is an awful lot of hidden storage behind the skirted counter. For all those cans of tuna and boxes of Cheerios, I suppose.

 Another skirted counter.   

Here, there is hidden storage in the cabinet on the left.  Wonder what's in that basket next to the turquoise table?  Magazines?


In these unfitted kitchens, we sometimes see doubles.

Two stoves.  Is that a Rayburn on the right?  (Love the row of hooks as a way to finish off the subway tile.)


 And two fridges. 


Sometimes you'll see an unfitted kitchen that has been put together using a few standard kitchen cabinets.  

Like this teensy apartment kitchen.  To the left of the stove looks like what might be a standard cabinet.  Or perhaps it's another dishwasher. 

This kitchen, which belongs to blogging friend, Steve of An Urban Cottage, was cobbled together using painted stock cabinets.  Steve put a matching set on either side of his existing free standing stove.

You can just see a standard built-in kitchen cabinet on the far left of this photo.  Can you guess what it holds?  We see the stove, we see the fridge...


The only built-in part of this on-one-wall kitchen holds the sink and dishwasher. Every other portion is free standing.


I love the look of these unfitted, cobbled together kitchens.  In a way, it might be unfair to call them cobbled together because I imagine it takes quite a bit of time, effort, and luck to find just the right pieces to create the perfect puzzle.

I don't think I could ever live with one permanently.  I'm too messy a cook to have to deal with the food that falls between the cracks of the antique work table next to the sink.  I don't want to have to clean the floor under all those open legs.   And don't get me started with the curtains.  They'd be absolutely filthy with two preschoolers in my house.

There's a reason that the Old World kitchens of yore have morphed into the sleek, seamless counter topped, sink under-mounted, kick-plated, use-every-inch-to-capacity kitchen of today. 

Still, this might be an idea to consider if you were faced with a horribly dated kitchen and didn't have the budget for a total custom-fitted overhaul.  And it would certainly work in a vacation home where the kitchen wouldn't be used on a regular basis. 

What say you?  Do you like the look?  Could you live with a cobbled together kitchen? 

Bonus points if you can name the one modern appliance missing from every single one of these pictures.   


Where does Pottery Barn Get Its Inspiration?

$
0
0


I just found the time to flip through my new Pottery Barn catalog.  What timing!


Get a load of these new pieces by PB.


Gridley Caged Storage Cabinet

Hmm, where have we seen this before?


Still not sure?


 Oh right, it's the old French wire piece in this photo which has now made it's fourth of fifth appearance on this blog.   The kitchen belongs to Donna Brown, of The Gray Door -- an antiques store in Houston, Texas.

I'm betting PB's new Hendrix collection is inspired by Donna's antique filing cabinet.


Which she uses as cabinets and counter next to her stove (seen right).

 A dresser in the new Hendrix collection.

The resemblance is striking, don't you think?


Pottery Barn, I'm available for hire.  I've seen lots of pretty pictures and have inspiration ideas coming out the wazoo. ;)


Making exterior windows look larger.

$
0
0

I recently pinned the above photo.  Not necessarily because I love the exterior of the house, though it is cute, but because I want to point out what those green shutters on the porch are doing to the overall appearance of the house. 

They are essentially making the windows appear much larger than they really are.  We see this trick using curtains:

Same size window, differently hung curtains.

Here the curtains are hung high and wide to make the window appear larger and the ceiling appear higher.  (My absolute favorite decorating trick!)


Unlike the curtains, the shutters, which typically stop at the sill, are extended down to the porch floor.  The area below the window has been painted the color of the window trim.  What a great way to make those windows look like French doors!  And three times larger than they actually are. 


Board and Batten Siding

$
0
0


I've always been enamored with all things inside the house, so it surprises me that I've been so devoted lately to exteriors.  My Outside board on Pinterest started out as a measly little thing, but has grown to gigantic proportions:  351 pins to date.  Only my kitchen board tops that. 

I really ought to separate it into more specific categories like Gardens, Porches, Architecture, etc.  But until then, I've combed through a huge number of pins for this post.  It's only recently that I've noticed I've been pinning an awful lot of houses with board and batten siding. 

 
 This is a simple facing, but I absolutely love the way it looks.  Especially if painted white and paired with black roofs, trim, lighting, or hardware. 


I see board and batten a lot in Northern California.  Here, the ranch house reigns in the newer (read: post 1940s) communities.   Love it paired with a metal roof, like in this photo of a newly built Sonoma ranch house.   This is architecture done right. 

 Here is a similar look at an inn in Napa Valley. You have to look closely to see the board and batten.


It definitely has a bit of a modern farmhouse feel.  Board and batten looks great paired with gravel.

 Love it here too with the stone base.  (I'm sure there's a name for the band going around the bottom portion of the house, but I can't think of it right now!)

More white board and batten paired with a metal roof.  Raise your hand if you'd like to have this outdoor fireplace.

 Love the board and batten on this little outbuilding. 


 Kelley of The Polished Pebble has white painted board and batten on the exterior of her Southern California house, as seen here in Country Living.

 Another porch. 


 Here is an example of board and batten paired with a shingled roof.


 And another shingled roof.  Board and batten is simple enough, that with traditional black shutters, it still pairs well this rustic table and chairs. 


I absolutely love this board and batten entry with the black door, overhead light, and gravel. 


 Here's another example with a painted black screen door. 


Board and batten siding looks great in other colors too:


black with white trim
dark green with white trim


Even various shades of grey.


So there you have it.   A little taste of my board and batten heaven. :)


click photos for sources


$15 Ikea Shelf

$
0
0

I recently added this $15 Ikea galvanized shelf to this awkward space next the fridge in our kitchen.  I
I've had my eye on them for a while now, and because they've been out-of-stock at our local Ikea, I stopped at another on our way home from vacation and purchased two.  How can you not at that price?

This space used to be a dumping ground for my girls' and my jackets, shoes, etc. And it always looked a mess.

Here's the before and after.


The set of shelves are a lot shorter than I expected them to be.  Thankfully, I had this mirror that I made from a cabinet door which I had removed to make an open shelf look when I painted the kitchen.


The mirror used to reside here in order to bounce light from the window you see in the above pic.


 And even though it did reflect the light, I always felt it was a tad tall for this spot. 

Anyway, I think it looks way better above the set of shelves.  And helps bring the eye up to the cabinets above the fridge. 
And the mirror still reflects light from the laundry room window which is where I was standing as I took the picture.  Now I've got space to store some cookbooks, the mineral water we buy by the case, and I've freed up one cabinet full of pots and pans along with some counter space for my rarely used mixer.   

I quite like this utilitarian set of shelves. 


Here they are styled for an Ikea shot. 

And they keep popping up in other other places too.


They add a nice nice industrial edge, don't you think?  Their one draw back is that they are a tad wobbly and do need to be fixed to the wall.  But at fifteen dollars a pop, I'm not going to complain.


click photos for sources

Orange on the Outside

$
0
0
orange steps


orange door

and another


Just noticing and appreciating these little bits of orange on the exteriors of white houses.

What a warm and happy welcome.


[click photos for sources]

It's time again for the Rockridge Kitchen Tour!

$
0
0
photo credit:  Natalie Mehta

Every two years, the planning council in my neighborhood of Oakland, California hosts a kitchen tour featuring 8 to 10 recently remodeled kitchens in our historic craftsman neighborhood.

The above photo of the 2011 Rockridge Kitchen Tour is one of the most pinned pictures on this blog.   This kitchen was created with Ikea cabinets boxes to which custom fronts were added.  As can happen with Ikea kitchens, there was some leftover space next to the fridge, so the contractor suggested it be used as a set of cookbook shelves.  How clever!

That's the beauty of these kitchen tours.  Led by a docent with full knowledge of the remodel process, it is fascinating to see how the spaces in each home were used, how problems were dealt with, and there are always tons of clever and beautiful details to file away.
A kitchen on this year's tour.  photo credit:  Kelly Patrick Dugan

If you are local to the Bay Area, you can pre-purchase tickets for the September 29th event here.   Proceeds go to the Rockridge Community Planning Council and are used to support a wide range of community activities.

And if you are interested in volunteering to be a docent, please contact Nancy at docents@rockridge.org  
There are perks including a pre-tour of all the kitchens plus a complimentary ticket for the day of the event!


Too much or just right?

$
0
0

I'm really liking the cement tile trend.  And I am a huge fan of both the color and pattern in this tile.  But I do wonder if it is too much?  Would I like it better if it was only on the floor?  Or if it ran up only wall.  Or perhaps half of the wall?

What do you think?  Do you love a room full of pattern, or do you need a quiet place to rest the eye?

[click on photo for source]

Bay Area Real Estate Sampler

$
0
0
 source

You know how some magazines have a feature where they show gorgeous old houses around the country labeled with impossibly inexpensive list prices?

Today's blog post is going to do the exact opposite.  

Below are three houses that came up in a search for our first house in San Francisco's East Bay.  If you live in an area of the country where real estate is expensive, these prices may not surprise you much.  But for those of you living elsewhere, hold on to your hats.  By the end, you'll be feeling grateful for your local real estate market!


First up is this 2 bedroom, 1 bathroom house.  I have nothing against manufactured houses, but I have a problem when they are listed for $425,000!


If you are going to ask me to pay $525K for this 2 bedroom, 1 bathroom, please, please at least move out and hire a stager to come in.  I think there might be a fireplace buried under there somewhere.

This two bedroom, one bathroom is nice enough.  At around 900 square feet it's definitely on the small side, but the list price of $550K seems ok when you compare it to the previous two houses.  Except that rumor has it there were fifteen offers on this house and that it sold for closer to $800K. 

As a matter of fact, if you have a decent enough looking house in moderate to good condition here, you can expect it to sell for 20 to 25% above asking price.  That's right.  Above asking price.

And while we don't live in San Francisco, I can tell you that after reading this article on the rise of micro apartments there, I'm glad it's not on our radar.

Kayla Smith orders groceries on her laptop. She replaced her desktop computer as part of paring her possessions. Photo: Carlos Avila Gonzalez, The Chronicle
via
Because this micro-apartment, which is size of a one car garage, rents for $1800 a month.  And it happens to be located in the single worst neighborhood of San Francisco. The kind where you are likely to step over a passed-out crack addict on the way out your front door. 

As you can see, our house search was starting to look pretty hopeless, but we kept at it.  After years of living frugally and saving, saving, saving, we closed yesterday on a teensy, tiny but totally adorable two bedroom house.  I recently joked with a friend that I might be changing the name of this blog to Living in Miniature.

More details to come, but in the meantime, get ready for lots of small space design posts. :)


Our First House

$
0
0

I've always been a huge fan of Spanish Mediterranean/Spanish Revival houses -- and California is particularly chock full of them.  Our new house, like many in the Bay Area, was built in the 20s and combines some Spanish features, like the parapet walls and arched entryway, with a Craftsman layout and interior detailing. 

(For safety, this real estate drawing is as much as I'll ever show of the exterior of our house.)

Here are some of my favorite features in our new, old house.  Hope you'll excuse my poor quality iphone photos. 
Our front French door is original to the house.   Normally, having a front door one can see through might bother me in terms of privacy, but it looks onto an entry wall with a built-in arched niche.

I can't wait to decide what goes in the niche, but I imagine I'll change it, much like a mantel, with the seasons and holidays.


From the entry, you turn left into the living room.  The French doors on the right lead to the dining room.   I'm a sucker for French doors.    


In the dining room is this beautiful built-in sideboard which an arched niche above it.  Through the open door (the old-fashioned two-way swing kind) you can see a bit of the old-school kitchen and the door that leads to the utility room and garage.

In this staged real estate photo, you can see another of my favorite house features, the Craftsman built-in cabinets on the left wall.  The drawers don't pull smoothly and the whole thing is fairly shallow, but I'll never, ever get rid of this built-in.  If you are wondering what the dead space is between the two upper cabinets, it is the back wall of the niche in the entry.

The rest of the kitchen was put in later, and while I don't love it, especially the tiled counters, it is definitely something I can live with for awhile.  It will be fun to work with what I have.  Will show more photos of that space later. 


I took this photo for two reasons.  The first is to show you our only (tiny) bathroom with its vintage hex tile floor.  And the other is to show you the linen closet door on the left.  It is one of only three closets in the entire house and they are all severely lacking.  On another note, see the glass door handle on the linen closet?  Every door on the house has them, and I think they're absolutely divine.

I took this last photo from one of the two bedrooms because I think it does a good job of showing the abundance of light in the house.  Would you believe I took this photo on a dreary, rainy day?

I hope this post illustrates why I fell in love with the house.  At a mere 1012 square feet (for our family of four!), it will definitely have its challenges and I'll show some of those in upcoming posts -- wait until you see the closets.  But in my mind, all the charming features (and the neighborhood and great schools) make up for what's lacking.  And, I'm actually really looking forward to the challenge of small space planning! 

We move next Monday. Wish us luck.

To those of you in the U.S., hope you have a nice Thanksgiving holiday! See you on the other side of Black Friday. 


Finally getting pictures hung.

$
0
0


Well, here I am again after three months away.  I'd been giving some serious thought to publishing my last post.  But after hanging a few pictures in our room, the light was so pretty I couldn't help but dig out the camera to snap a few pictures of at least one room in our new house.   Ironic since I never really showed our room in the apartment. 

A few things to note:

  • I haven't yet managed to ditch my vintage chevron blanket.  I've been looking for a replacement to fold at the end of our bed, and I am thinking of this one -- I'll forever be a fan of yellow. 
  • Still head-over-heels for ticking stripe.  The bed is a tad disheveled, but that's real life.  Still need a headboard!
  • Now that we share one teeny-tiny bathroom, I'm trying to teach my five year-old twin girls that ALL primping is done in the bedroom instead.  (Thanks for the tip, Elizabeth B.!)   My hair and make-up stuff is stored in a back-of the-door shoe hanger (in the closet next to the mirror), but the jewelry stays out on display.
  •  We somehow ended up with the same yellow-y beige wall color as our last place.  Since the entire house was freshly painted when we moved in, and since there are so many other tasks to be completed first, I'll wait to paint until the walls start to show wear.  And with kids in the house, that has already started to happen.
  • Last, I LOVE our new house.  It felt pretty small at first (1000 sq. feet) but we quickly became used to it.  It is cozy and light-filled and just about perfect.  Of course I've got a list of about a million projects to do, but they're really just the icing on the cake.  Very happy and grateful to be in our tiny, little home. 
Viewing all 102 articles
Browse latest View live